In January of 2002 the Hero's Emporium modelling bulletin board challenged it's members to build "Robin's Ride" for it's most recent online contest. Such contests are intended to promote member involvement, strengthen the sense of community, and give everyone a chance to stretch their creativity and share their work with others of the same interests. "Robin's Ride" was just such a contest for me.
Essentially the idea was: "Batman has his cool Batmobile, now Robin needs something. It can roll, hop, swim, fly, sail, run, or any other means of locomotion that can get Robin from one place to another in style." The project could be built from anything and did not require a figure of Robin (thankfully, since I would never have completed it on time otherwise).
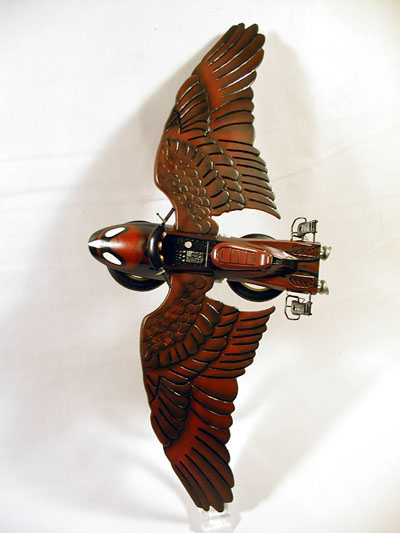
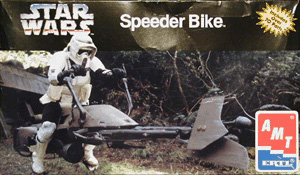
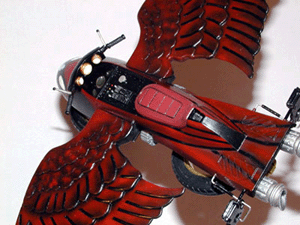
The Speeder Bike from Return of the Jedi was the inspiration for my "over-the-top" creation for Robin.
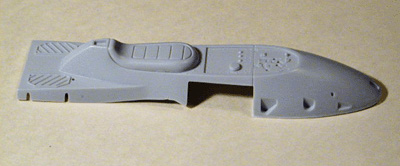
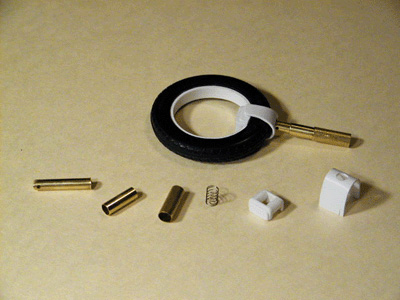
The single most important part out of the kit would be the body shell. This, the seat, a few pieces of the handlebars, and the foot pedals are the only pieces that ended up in the final project.
Most of the project would end up coming from salvaged bits off of other junk kits and scratchbuilt features using sheet styrene, brass and aluminum tubing, and whatever other found bits seemed to work together.
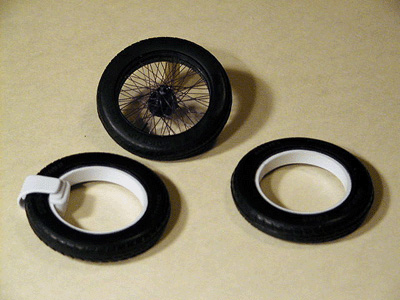
The wheels were the first area of concern. The basic wheels came from an old Entex large scale car kit. The spokes were removed and the rim was lined with styrene to create a hubless wheel. More styrene was used to build up the wheel mount and fork. The mounting shaft was created from nested brass tubing with a spring to keep tension in the structure while still allowing it to pivot. As it turned out, the spring acted perfectly as a functional suspension as well.
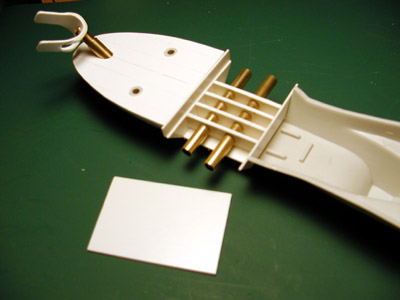
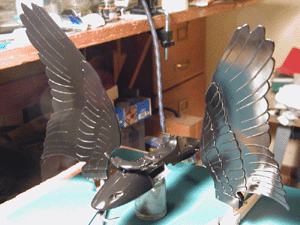
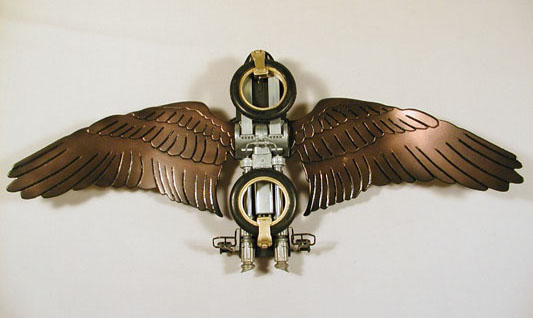
Another vital feature of the project was to be it's wings. This required some way to mount them that could take the strain of what I had in mind. A styrene box was built and four holes were drilled through the strengthening struts for the brass tubing that would mount the wings. This platform would also affect the layout of the engine components that would cover it. In this photo the front wheel mount can be seen...another obstacle to work around.
Using more found parts, some rectangular brass tubing, aluminum tubing, and a bit of twisted imagination I started piecing together something that might pass as a jet engine for the project. Everything had to nestle close to the underside of the body since the wheels had to fold back when the bike would be in flight mode. In this photo there are more parts from the previous Entex car, some bits from a semi-truck kit, some Amtronic car parts, Star Wars Snow Speeder parts, and a couple of bits from another Entex car from a friend's parts box (the two round brown bits.)
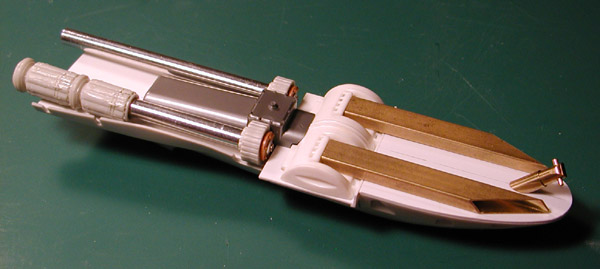
The rider would have to have some place for his feet as well as some sort of extra controls while in flight. To solve this problem the foot pedals from the original kit would be modified. Mounted higher and further back so the rider could be in more of a prone position, the pedals were mounted to a brass rod and linkages were fashioned from more brass wire and tubing. Some additional bits from the parts box allowed me to connect the linkages to the back of the engine; giving the impression that they controlled the engine in some way.
In the photo to the right you can see the rear wheel mount jutting up from behind the engine and some of the completed engine itself in it's magnesium silver.
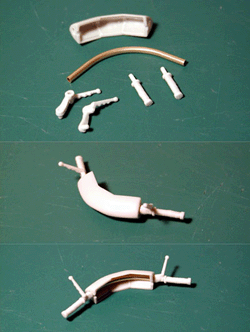
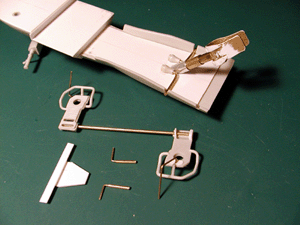
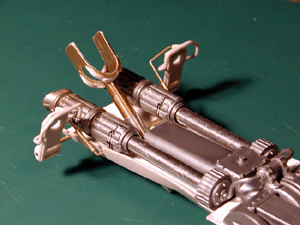
Naturally, there had to be some way for the rider to steer the bike/bird. To deal with this I dug into the parts box again and came up with three pieces I could cut and splice into a faring of sorts. Grips from the Speeder Bike and some brass tubing to connect everything and I had myself an acceptable handlebar for the bike. This would be lined with styrene and three gauges would adorn the driver's side. Brass tubing would mount it to the bike and become the steering shaft.
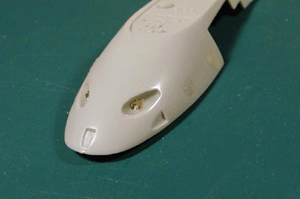
One more vital modification had to be made before I could actually start assembling the body...the eyes of the bird, it's headlights. Pointed ovals were cut out of the body and backed with epoxy putty that I could shape. In each a brass tube was installed for the actual light.
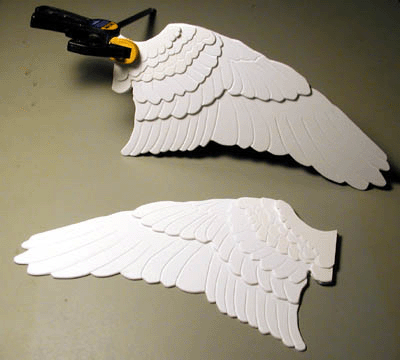
Now it was time to create the most distinctive feature of the project--the wings. Starting with a pattern I took from an article on how to clip the feathers of your pet bird (no, really!), I printed a copy in scale with the bike. Using this pattern I cut layers of styrene for each layer of feathers I wanted to represent, using progressively thinner sheets per layer. I then scribed in the individual feathers and glued the layers into a sandwich of sorts. Using a heat gun, I bent the wings slightly over a large tin drum (the kind you get pre-popped popcorn in at the store). Some sanding to smooth the edges and creating the mounting point on each wing where it mated to the body and I had my wings!
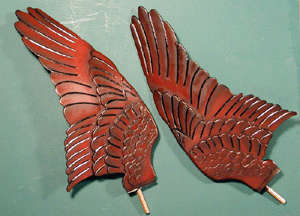
Okay, it was finally time to paint. I wanted to use the robin from Dick Grayson's helmet in Batman Forever as my pattern (that's why the oval eyes). I started with a gloss black base color, using enamel paint for the longer drying time so the paint could level and give a smoother finish. After a couple of coats of black, sanding between coats, I used 1/8" wide tape to cover the feather lines on the wings top and bottom and painted an acrylic red from a low angle over the top side of the wings. I concentrated on only half on each feather, letting the color fade away toward the next feather. A similar fading technique was used for the feather striping on the body of the bike. To even out the effect on the wings I sealed them with a satin clear coat and went back with a gloss by hand over the black feather stripes. The body didn't need this same attention, go figure!
It took a couple of attempts to get the bird's head painted acceptibly on the nose of the bike. First, the headlight recesses were painted white with yellow dots for the lights and then filled with clear epoxy. When this had cured a mask covering the black outline around the eyes was cut from masking tape. A second mask for the outline of the head was cut from tape as well and the two were placed carefully. The red was painted in the same manner as the wings, concentrating in the center and fading to the outside. The beak was masked with a couple pieces of tape and lightly airbrushed and highlighted by hand.
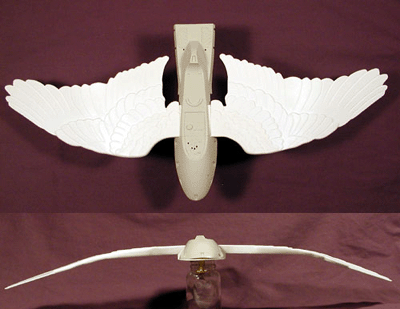
The bottom of the wings received an interference copper over the black to better blend with the metallic tones on the bottom of the bird.
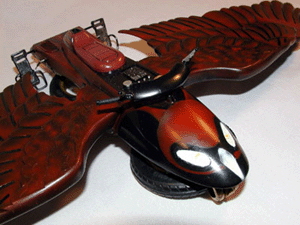
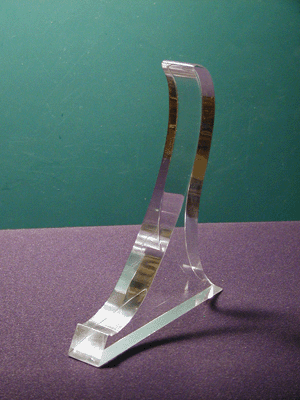
The final detail was to create a display stand for the bird. I wanted something that could hold it by the wing like it was in a steep bank. I also wanted to allow people to see the bottom detail rather than have the stand cover everything. Using an acrylic bookshelf bracket I found at a recycled goods store called "Creation Station" I mapped out a shape that would eliminate all of the pre-drilled holes in the plastic. After about 8 hours of grinding and hand polishing I had my stand. The wing tip would sit behind the bottom lip and the top of the stand would rest behind the wing near the wingroot.